Voltmeter using 8051

Electronics Junction

http://www.hubcity.net

Descrption:

Voltmeter using 8051:

A simple 0-5V voltmeter using 8051 is shown in this article. This digital voltmeter has a sensitivity of 200mV which is a bit low but this project is meant for demonstrating how an ADC and seven segment display can be interfaced to 8051 to obtain a digital readout of the input voltage. A 31/2 digit high end voltmeter will be added soon. ADC0804 is the ADC and AT89S51 is the controller used in this project. Before attempting this project, go through these projects Interfacing ADC to 8051 and Interfacing seven segment display to 8051 which will give you a good idea on the basics.

Circuit diagram:

17


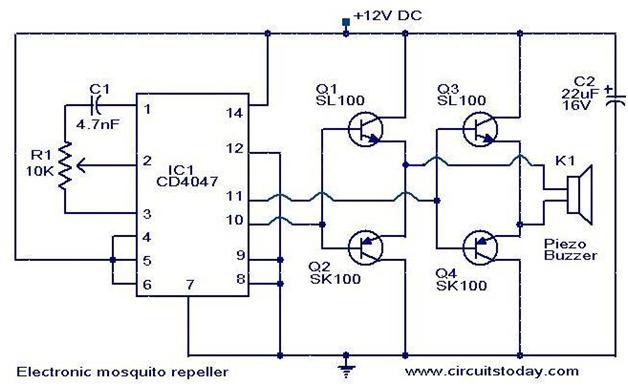
0-5 digital voltmeter using 8051

About the circuit:


In the circuit Vref/2 (pin9) of the ADC is left open and it means that the input voltage span can be o to 5V and the step size will be 5/255 = 19.6mV. The equation for the digital output of ADC0804 is Dout = Vin/Step size. In this circuit, for an input voltage of 1V the digital output will be 1/19.6mV = 51 and so the binary equivalent of 51 ie 00110011. Digital output of the ADC is interfaced to P1.0 of the microcontroller. Control signals for the ADC ie CS, RD, WR and INTR are available from the P3.7, P3.6, P3.5 and P3.4 pins of the microcontroller respectively. 2 digit multiplexed seven segment display is interfaced to Port0 of the microcontroller. Control signals for the display driver transistors Q1 and Q2 are obtained from P3.2 and P3.1 of the microcontroller. Push button switch S1, capacitor C2 and resistor R10 forms a debouncing reset circuitry.

Program:

ORG 00H

MOV P1,#11111111B

MOV P0,#00000000B

MOV P3,#00000000B

MOV DPTR,#LABEL

MAIN: CLR P3.7

SETB P3.6

CLR P3.5

SETB P3.5

WAIT: JB P3.4,WAIT

CLR P3.7

CLR P3.6

MOV A,P1

MOV B,#10D

DIV AB

MOV B,#2D

MUL AB

MOV B,#10D

DIV AB

SETB P3.2

ACALL DISPLAY

MOV P0,A

ACALL DELAY

MOV P0,#10000000B

ACALL DELAY

MOV A,B

CLR P3.2

SETB P3.1

ACALL DISPLAY

MOV P0,A

ACALL DELAY

CLR P3.1

SJMP MAIN

DELAY: MOV R3,#02H

DEL1: MOV R2,#0FAH

DEL2: DJNZ R2,DEL2

DJNZ R3,DEL1

RET

DISPLAY: MOVC A,@A+DPTR

RET

LABEL: DB 3FH

DB 06H

DB 5BH

DB 4FH

DB 66H

DB 6DH

DB 7DH

DB 07H

DB 7FH

DB 6FH

END

About the program:

At first the program controls the ADC to produce a digital output corresponding to the input voltage.This digital output is scanned through P1.0 and is loaded to accumulator. Then the value in the accumulator is divided by 10 to omit the last digit. For example, let the input voltage be 4V. Then the corresponding digital output of the ADC will be 204D (D stands for decimal) .After the the division by 10, the value left in the accumulator will be 20D. This 20D is then multiplied by 2D which results in 40D. The next target of the program is to manipulate this 40D and make a 4.0 readout on the display. For this the 40D is again divided by 10D . This results in 4 inside accumulator and 0 inside B register. Then the program gets the digit drive pattern for 4 using the lookup table , puts this pattern on Port 0 and activates Q1. After 1 ms delay 10000000B is loaded to P0 and this accounts for the dot. After a further 1ms delay Q1 is deactivated, content in B (ie 0) is moved to A, gets the correct digit drive pattern for 0 using the lookup table, puts this pattern on Port 0 and activates Q2. After a further 1ms delay Q2 is deactivated and the entire cycle is repeated.

Electronics Junction

http://www.hubcity.net

Temperature logger using arduino

Electronics Junction

http://www.hubcity.net

Descrption:

Simple temperature logger using arduino (°C & °F):

This project is about a simple USB temperature logging system using arduino uno and the serial monitor function in the arduino IDE. The system monitors the temperature every 2 seconds and shows it on the arduino serial monitor. The temperature is shown in °Celsius and °Fahrenheit. The system is interfaced to the PC through the USB port. LM35 is used as the temperature sensor.

LM35 is three terminal linear temperature sensor from National semiconductors. It can measure temperature from-55c to +150C. The voltage output of the LM35 increases 10mV per degree Celsius rise in temperature. LM35 can be operated from a 5V supply and the stand by current is less than 60uA. The pin out of LM35 is shown in the figure below.

15

Circuit diagram:

16

Temperature sensor LM35 is interfaced to the Arduino through the analog input pins A0, A1 and A2. Analog input pin A0 is made high and it acts as the 5V supply pin for the LM35. Analog input pin A2 is made low and it acts as the ground pin for the LM35. Analog input pin A1 is set as an input and the voltage output of LM35 is coupled to the arduino through this pin. This scheme is very useful because you can plug the LM35 directly into the analog input female connector and no external connection wires are needed. The arduino board is powered by the PC through the USB cable and no external power supply is needed in this circuit. The USB port also serves as the medium for communication between arduino and PC.

Program:

int t=0;

int vcc=A0; // sets analog input A0 as +5V source for LM35

int sensor=A1; // sets A1 as the sensor input

int gnd=A2; // sets analog input A2 as ground for LM35

float temp;

float tempc;

float tempf;

void setup()

{

pinMode(vcc,OUTPUT);

pinMode(gnd,OUTPUT);

pinMode(sensor,INPUT);

digitalWrite(vcc,HIGH); // sets analog input A0 HIGH

digitalWrite(gnd,LOW); // sets analog input A2 LOW

Serial.begin(9600);     // sets the baud rate at 9600


}

void loop()

{ delay(2000); // calls a 2 second delay

t=t+2;       // increments the time by 2 every two seconds

temp=analogRead(sensor); // reads the LM35 output

tempc=(temp*5)/10;       // converts the digital value into temperature degree C

tempf=(tempc*1.8)+32;   // converts degree C to degree F

Serial.println(“……………”);

Serial.println(“Temperature logger”);

Serial.print(“Time in sec = “); // prints the time on serial monitor window

Serial.println(t);

Serial.print(“Temperature in deg C = “); // prints the temperature in degreeC

Serial.println(tempc);

Serial.print(“Temperature in deg F = “); // prints the temperature in degreeF

Serial.println(tempf);

}

About the program:

The voltage output of LM35 is connected to the analog input A1 of the arduino. The voltage at this pin will be proportional to the temperature and this voltage is read using analogRead function. The analogRead function will read the voltage (in a range 0 to 5) at a particular analog input pin and converts it into a digital value between 0 and 1023. For example, if 29°C is the temperature, the output of LM35 will be 290mV. The result of the analogRead function will be 290mV/(5/1023) =59. There must be some way to convert this 59 to 29.0 for displaying in the serial monitor window. This is done by multiplying 59 by 5 and then dividing the result by 10. The result will be the temperature in °C and it is displayed using Serial.print function. Then it is converted to °F using the following formula: °F= (°C*1.8)+32. The temperature in °F is also displayed. The serial monitor can be accessed from the Tools tab in the arduino IDE. The shortcut for serial monitor is ctrl+shift+M. The snapshot of the serial monitor window

Electronics Junction


http://www.hubcity.net

Infrared motion detector circuit

Electronics Junction

www.hubcity.net

Description.

Here is the circuit diagram of an infrared motion detector that can be used to sense intrusions. Infra red rays reflected from a static object will be in one phase, and the rays reflected from a moving object will be in another phase. The circuit uses this principle to sense the motion.

The IC1 (NE 555) is wired as an astable multivibrator. The IR diode connected at the output of this IC produces infrared beams of frequency 5Khz. These beams are picked by the infrared sensor, photo transistor Q1. At normal condition, that is, when there is no intrusion the output pin (7) of IC2 will be low. When there is an intrusion the phase of the reflected waveforms has a difference in phase and this phase difference will be picked by the IC2. Now the pin 7 of the IC 2 goes high to indicate the intrusion. An LED or a buzzer can be connected at the output of the IC to indicate the intrusion.

Circuit diagram with Parts list.

Infrared motion detector circuit

Notes:

  • Comparators IC2a and IC2b are belonging to the same IC2  (LM1458). So the power supply is shown connected only once. No problem.
  • When there is disturbance in the air or vehicles passing nearby, the IR motion sensor circuit may get false triggered.
  • POT R5 can be used for sensitivity adjustment.

Electronics Junction

www.hubcity.net

Digital volume control circuit

Electronics Junction

www.hubcity.net

Description.

A two channel digital volume control circuit based on IC MAX5486 is shown here. MAX5486 is a 40K dual digital volume / balance controller that has a pushbutton interface. The IC has a built in bias voltage source that eliminated the need of an external circuitry for the same purpose and thereby by reduces external parts count. The IC also has an LED status indicator driver circuit which can be used for driving the status indicator LEDs which indicates the volume level and balance level. The IC can be operated from a single or dual power supply and is available in 24 pin TSSOP package. The volume control circuit based on MAX5486 can be applied in a lot applications like personal audio systems, hand held audio devices, home theatre systems, car audio systems, computer audio systems etc.

Circuit diagram with Parts list.

Digital volume control circuit

Circuit description.

The right channel input is applied to the pin8 (high terminal (HR) of first internal digital potentiometer of the IC) and left channel input is applied to the pin17 (high terminal (HL) of the second internal digital potentiometer of the IC). Low terminals (pin 9 and 6) of the internal potentiometers are shorted and connected to the mid bias voltage output (pin11) of the IC. The right channel output is available at the buffered wiper terminal (pin10) of the first internal potentiometer and left channel output is available at the buffered wiper terminal of the second internal potentiometer of the IC. A 1uF capacitor is connected from the bias generator bypass (pin12) to ground. The purpose of this capacitor is noise bypassing. The purpose of capacitors C4 and C5 are to bypass noise from the VDD and VLOGIC sources. This improves the overall stability and performance of the circuit.

LEDs D1 to D5 are the status indicator LEDs which indicates the current volume and balance levels. R1 to R5 limits current through the corresponding LEDs. 1M resistor R6 is meant for activating the status indicator LED drivers. LED D6 represents the current operation mode of IC. When it glows, the IC is in balance control mode and when it is off, the IC will be in volume control mode. Resistor R7 limits the current through LED D6. In the volume control mode the status LEDs work just like a bar graph display indicating the current volume. In the balance control mode, the centremost LED alone glows when there is a centred balance. In the mute mode, all status indicator LEDs remain OFF.

Push button switches S1 to S4 are used for controlling the circuit. Pressing S1 will push the IC into mute mode. Push button S4 can be used for selecting between volume control mode and balance control mode and LED D6 indicated it. Push button S2 and S3 are used for increasing and decreasing the volume in the volume control mode and shifting the balance to left and right in the balance control mode. The Vss pin of the IC is grounded because single supply operation is employed in this circuit. Shutdown pin (pin6) is tied to the VLOGIC source for disabling the shutdown function. Connecting the shutdown pin to the ground will drive the IC to the shutdown mode.

The output of the MAX5486 is sufficient enough to drive standard high impedance headphones. For driving low impedance headphones or speakers an amplifier stage must be added to the output. The maximum power dissipation of MAX5486 is 675mW and consider this point while selecting the loads.

Notes:

  • The circuit must be assembled on a good quality PCB.
  • Use 5V DC for powering the circuit (both VLOGIC and VDD).
  • The power supply must be well regulated and free from noise.
  • Switches S1 to S4 are used for controlling the circuit.
  • LED D1 to D5 are status indicators.
  • An additional amplifier stage is required for driving low impedance loads.

Electronics Junction

www.hubcity.net

Pocket headphone amplifier

Electronics Junction

http://www.hubcity.net

Description:

Here I present a very simple and powerful headphone amplifier using OPA134. In addition to the IC OPA134, the circuit uses only few passive components and can easily generate a lot of sound from even the most inefficient headphones and there will be no compromise for the quality.

OPA134 is low noise, low distortion operational amplifier from BURR-BROWN semiconductors and it is exclusively meant for audio applications. The FET based input stage provides the IC with high input impedance and it makes the circuit very flexible in terms of the audio source. You can plug almost all types of sound sources like, mp3 players, iPods, mobile phones etc to the circuit.

In the circuit IC OPA134 is wired as a non-inverting amplifier. The +/-4.5V split power supply required for the IC is obtained from a 9V PP3 battery using the circuit comprising of components D1. R6, R7.R8, C2 and C3. D1 is an LED which indicates power ON. Switch S1 can be used as a ON/OFF switch .Resistor R2 and capacitor C1 forms a high pass filter with corner frequency around 15KHz.POT R1 can be used as a volume controller. The load resistor R5 will stabilize the virtual ground and prevents any noise or distortion in the output, but the output will be DC coupled.

Circuit diagram:

6

 Notes:

  • Assemble the circuit a good PCB.
  • The circuit can be powered using a 9V PP3 battery.
  • POT R1 can be used as a volume controller.

Electronics Junction

http://www.hubcity.net

Digital code lock using arduino

Electronics Junction

www.hubcity.net

Description.

Digital code lock or digital combination lock are a type of digital locks where a combination of digits/characters or both are used for unlocking the lock. This article is about a simple digital code lock using arduino. Here the code consists of a combination of digits from 1 to 6. There are separate keys for locking and unlocking the system. The system can be unlocked by pressing the unlock button after entering the correct combination of digits. A hex key pad is used as the input device. Only the first two rows of key (1, 2, 3, A, 4, 5, 6, B) are used in this project. A is used for locking the system and B is used for unlocking the system. Read this article Interfacing hex keypad to arduino for knowing more about hex keypad and its interfacing to the arduino. The circuit diagram of the digital code lock using arduino is shown in the figure below.

Circuit diagram:

Digital code lock using arduino1


int p[6]; //array for storing the password

int c[6]; // array for storing the input code

int n;

int a=0;

int i=0;

int lock=3;

int r1=6;

int r2=7;

int r3=8;

int r4=9;

int c1=10;

int c2=11;

int c3=12;

int c4=13;

int colm1;

int colm2;

int colm3;

int colm4;


void setup()

{

pinMode(r1,OUTPUT);

pinMode(r2,OUTPUT);

pinMode(r3,OUTPUT);

pinMode(r4,OUTPUT);

pinMode(c1,INPUT);

pinMode(c2,INPUT);

pinMode(c3,INPUT);

pinMode(c4,INPUT);

pinMode(lock,OUTPUT);

Serial.begin(9600);   //sets the baud rate at 9600

digitalWrite(c1,HIGH);

digitalWrite(c2,HIGH);

digitalWrite(c3,HIGH);

digitalWrite(c4,HIGH);

digitalWrite(lock,LOW);

p[0]=1;   //sets 1st digit of the password

p[1]=2; // sets 2nd digit of the password

p[2]=3; // sets 3rd digit of the password

p[3]=4; // sets 4th digit of the password

p[4]=5; // sets 5th digit of the password

p[5]=6; // sets 6th digit of the password

}

void loop()

{

digitalWrite(r1,LOW);

digitalWrite(r2,HIGH);

digitalWrite(r3,HIGH);

digitalWrite(r4,HIGH);

colm1=digitalRead(c1);

colm2=digitalRead(c2);

colm3=digitalRead(c3);

colm4=digitalRead(c4);

if(colm1==LOW)

{ n=1;

   a=1;

   Serial.println(“1”);

   delay(200);}

else

{

   if(colm2==LOW)

   { n=2;

     a=1;

     Serial.println(“2”);

   delay(200);}

   else

   {

   if(colm3==LOW)

   {Serial.println(“3”);

     n=3;

     a=1;

   delay(200);}

   else

   {

   if(colm4==LOW)

   {Serial.println(“LOCKED”);

   digitalWrite(lock,LOW); //locks

   i=0;

   delay(200);}

   }}}


digitalWrite(r1,HIGH);

digitalWrite(r2,LOW);

digitalWrite(r3,HIGH);

digitalWrite(r4,HIGH);

colm1=digitalRead(c1);

colm2=digitalRead(c2);

colm3=digitalRead(c3);

colm4=digitalRead(c4);

if(colm1==LOW)

{Serial.println(“4”);

   n=4;

   a=1;

delay(200);}

else

{

   if(colm2==LOW)

   {Serial.println(“5”);

   n=5;

   a=1;

delay(200);}

   else

   {

   if(colm3==LOW)

   {Serial.println(“6”);

     n=6;

     a=1;

   delay(200);}

   else

   {

   if(colm4==LOW)

   {

   if(c[0]==p[0]&&c[1]==p[1]&&c[2]==p[2]&&c[3]==p[3]&&c[4]==p[4]&&c[5]==p[5])

   {digitalWrite(lock,HIGH); //unlocks

   Serial.println(“UNLOCKED”);


   c[5]=9;}       //corrupts the code in array c


   else


   {Serial.println(“WRONG PASSWORD”);}


   delay(200);}

   }}}

   if(a==1) // test whether a digit key is pressed

   {

   c[i]=n; // saves the current digit pressed to array c

   i=i+1;

   a=0;}

   }

About the program.

The password which is “123456″ is stored in the array “p”. When ever the digit keys are pressed, they are stored in the array “c”. When ever the unlock button is pressed, the contents in the both array are compared and if they are same then digital pin 3 is made high. After this the content of array “c” corrupted by the program. This is done to prevent the correct code from remaining in the memory. If it is not done the system will unlock just on the press of the unlock button(B) after another lock cycle. Pressing the lock button(A) will make the digital pin low. The lock button has to be pressed before you enter the password each time.

The system can be connected to the PC through the USB and the pressed keys can be viewed through the serial monitor window of the arduino. The screen shot of the serial monitor window of this project is shown in the figure below.

Digital code lock using arduino2

When lock button (key A in the hex keypad) is pressed the serial monitor window will display “LOCKED”. The code entered will be also displayed on the window. When unlock button (key b in the hex keypad) is pressed the serial monitor window will display “UNLOCKED”. If the code entered is wrong the serial monitor window will display”WRONG PASSWORD”.

Notes:

  • For the present configuration ie; no solenoid, there is no need for the 9V external supply. The board can be powered by the PC through the USB.
  • The solenoid will consume a good amount of current and the PC’s USB port may be unable supply it. So when you are using a solenoid a separate external supply for powering it is required. The arduino board can be also powered from this external supply if it is 9V.   The number of digits in the password can be increased by modifying the program.
  • I have not shown the solenoid because I do not have one right now. I will add the updated circuit diagram and program as soon as I get one.

Electronics Junction

www.hubcity.net

Static 0 to 9 display

Electronics Junction

http://www.hubcity.net

Description:

The circuit shown here is of a simple 0 to 9 display that can be employed in a lot of applications. The circuit is based on asynchronous decade counter 7490(IC2), a 7 segment display (D1), and a seven segment decoder/driver IC 7446 (IC1).

The seven segment display consists of 7 LEDs labelled ‘a’ through ‘g’. By forward biasing different LEDs, we can display the digits 0 through 9. Seven segment displays are of two types, common cathode and common anode. In common anode type anodes of all the seven LEDs are tied together, while in common cathode type all cathodes are tied together. The seven segment display used here is a common anode type .Resistor R1 to R7 are current limiting resistors. IC 7446 is a decoder/driver IC used to drive the seven segment display.

Working of this circuit is very simple. For every clock pulse the BCD output of the IC2 (7490) will advance by one bit. The IC1 (7446) will decode this BCD output to corresponding the seven segment form and will drive the display to indicate the corresponding digit.

Circuit diagram:

14

D1 must be a seven segment common anode display.

All ICs must be mounted on holders.

Electronics Junction

http://www.hubcity.net

Metal Detector Circuit

Electronics Junction

http://www.hubcity.net

Description

This is the circuit diagram of a low cost metal detector using a single transistor circuit and an old pocket radio.This is nothing but a Colpitts oscillator working in the medium band frequency and a radio tuned to the same frequency.First the radio and the circuit are placed close.Then the radio is tuned so that there is no sound from radio.In this condition the radio and the circuit will be in same frequency and same frequencies beat off to produce no sound.This is the set up.When the metal detector circuit is placed near to a metal object the inductance of its coil changes , and so do the frequency of oscillations.Now the two frequency will be different , there will be no cancelling and radio produces a hissing sound.The metal is detected.

Circuit Diagram & Parts List:

5

Notes:

To make L1 make 60 turns of 36SWG enameled Copper wire on a 1 cm PVC tube.

Powering the circuit using a adapter rather than a battery induces noise. It is always good to power radio projects from battery.

Electronics Junction

http://www.hubcity.net

Simple battery charger circuit

Electronics Junction

http://www.hubcity.net

Description :

Here is the circuit diagram of a simple and straight forward 12 V battery charger circuit with diagram. This circuit can be used to charge all type of 12V rechargeable batteries including car batteries. The circuit is nothing but a 12V DC power supply with an ammeter for monitoring the charging current. The two diodes forms a centre tapped full wave rectifier. The capacitor filters the rectifier output to produce a clean 12V output.

Circuit diagram with Parts list:

13

Notes:

At initial stages of charging the ammeter will read about 1 to 3 amperes.

As the battery is slowly charged the current slowly decreases.

When the battery is fully charged the ammeter reading will be zero.

Always be careful to connect the charger to the battery in correct polarity. Positive to positive and negative to negative.

Electronics Junction

http://www.hubcity.net

Electronic Mosquito Repeller

Electronics Junction

http://www.hubcity.net

Description:

Here is the circuit diagram of an ultrasonic mosquito repeller.The circuit is based on the theory that insects like mosquito can be repelled by using sound frequencies in the ultrasonic (above 20KHz) range.The circuit is nothing but a PLL IC CMOS 4047 wired as an oscillator working at 22KHz.A complementary symmetry amplifier consisting of four transistor is used to amplify the sound.The piezo buzzer converts the output of amplifier to ultrasonic sound that can be heard by the insects.

Circuit diagram with Parts list.

4

 Notes:

  • Assemble the circuit on a general purpose PCB.
  • The circuit can be powered from 12V DC.
  • The buzzer can be any general purpose piezo buzzer.
  • The IC1 must be mounted on a holder.

Electronics Junction

http://www.hubcity.net